When an organization processes purchase requests through electronic approvals, it can be set up so that the list of all completed purchase request forms in Collavate is automatically recorded in a spreadsheet. Imagine a scenario in a large manufacturing company where purchase request forms from various departments are collected and managed, and it is necessary to check the details approved on a specific date. Each department uses the Domain Shared Template registered in Collavate to create and request approval for purchase request forms in a common format. If a Collavate Ledger is linked to this template, then there is no need for separate management of completed electronic approvals (approved, rejected, canceled). The details of the electronic approvals are automatically recorded in a separate spreadsheet. Later, you can easily check the details of the approvals, rejections, and document links for the purchase request forms in a single sheet.
This guide explains how to link a ledger to a template.
Create or link a ledger to a template #
When you link a ledger document (spreadsheet) to a Collavate template, approvals submitted using that template can be automatically recorded.
Step 1: Link a ledger to a template #
- Go to the Template menu.
- Go to My Templates or Domain Shared Templates.
- Create a new template to connect a ledger to, or go to an existing template’s modification screen.
- From the right-hand menu list, go to the Process
 Add result to sheet tab.
 - Choose a sheet to use as a ledger by clicking Copy sample or clicking Choose to choose one from the list.
- Copy sample: Load the default ledger settings provided by Collavate. You can use the sample sheet as is or modify it for your use.
- Choose: If you have an existing document ledger, you can find and connect that spreadsheet document.
| Note: You can only link Google Sheets files as ledgers. |
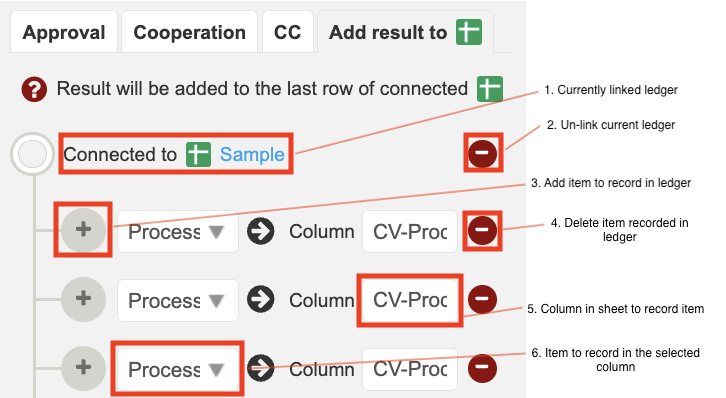
Step 2: Choose items to record in your ledger #
Once you’ve linked the ledger, you now need to specify the items to be recorded in each column. If you are using the sample, the items to be recorded are already specified as seen in the titles of each column. If you have chosen an existing ledger, you need to select the data to be entered and set the column in which it will be entered into.
- Go to the list of recorded items in the ledger tab.
- Select the item you want to record from the dropdown menu list.
- Click the column (#) button on the right and select the column in the connected ledger where this item will be recorded.
Step 3: Test your ledger settings and save the template #
Once you have specified all items, you can test the items you have connected and save them if there are no issues.
Once saved, whenever an organization member submits an electronic approval using that template and it is completed, it will automatically be recorded in the designated ledger.
- Click the Run Test button at the bottom.
- Test data will be input into the linked row.
- Check the inputted data.
- If all columns are functioning as intended, click the Save Template button.
Confirm and remove linked ledgers #
If the template is connected to a ledger, you can check the title of the connected ledger in the template menu list. Clicking the title of the connected ledger will open the file in Google Drive.
Warning: Make sure to check the editing permissions to prevent unintended users from manually changing or deleting values in the ledger.
Related Resources #
- Official Guide: Connect Template to a Ledger
- Youtube Video: How to automatically record your approved document history in a spreadsheet