Organizations use numerous common forms such as expense reports and leave applications to process approvals every month. When all members of an organization repetitively submit the same forms, custom settings applied to each template can reduce the time spent by members on submitting approvals. This also enables managers to efficiently search for and manage information in documents that have been approved.
1. Hiding unnecessary templates menus from the user screen #
In Collavate, users can upload their document templates in the My templates menu or modify and use domain-shared templates. If an organization wants to standardize all forms and limit the use of individual document templates, it can set up the system so that only the shared template menu is visible to general users when accessing the template menu. This can increase the reliability of documents submitted within the organization and reduce the time required for document creation, thereby improving efficiency.
Disable private and sample template menu #
- From the menu list, click
Admin.
- In the navigation menu, click Template.
- To disable my template menu, turn off My templates
.
- To disable my template menu, turn off Sample templates
- Click Save Settings.
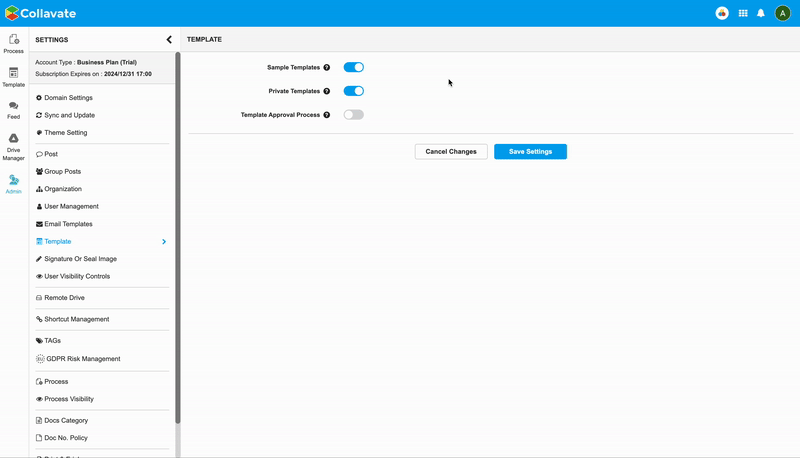
You can hide the “My templates” and “Sample templates” menu from the user screen.
2. Setting approval titles for each template #
| Note: To use this feature, you must use templates in Google Spreadsheet format. |
In Collavate, all submitted documents are automatically assigned a filing number at the time of submission based on rules set by the administrator. If separate file naming is desired for each template, administrators or template managers can utilize template document numbering policy. Such designated file names can be beneficial for searching, archiving, and managing approval documents in Google Drive and Collavate by template.
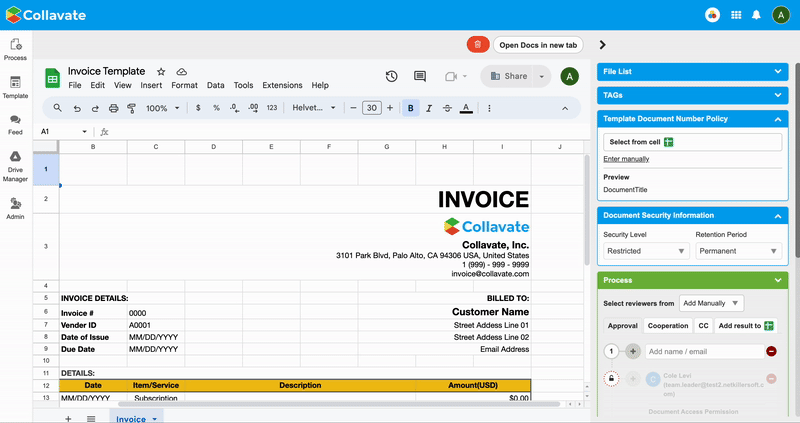
You can set titles for each template through the template document number policy.
Set template document number policy #
To set up template document numbering rules, follow these instructions:
- From the menu list, click
Template.
- In the navigation menu, click My templates or Domain shared templates.
- Create a new template or modify an existing template.
- Click on the Template Document Number Policy tab on the right side, then set the file name.
- Select from Cell: Choose a cell address and set the value entered in that cell as the file name.
- Enter Manually: Set the entered value as the template file name.
Note: You can check if the desired file name has been entered in the preview area at the bottom.
3. Set document security information for templates #
By utilizing the document security information feature, you can add security level information to documents submitted through each template. The added document security levels can be checked on the right side of each approval document in the “Document Security Information” tab. This allows specifying whether the content created through a specific template is sensitive to external leaks or needs to be disposed of within a certain timeframe, providing clear information to participants in the approval process.
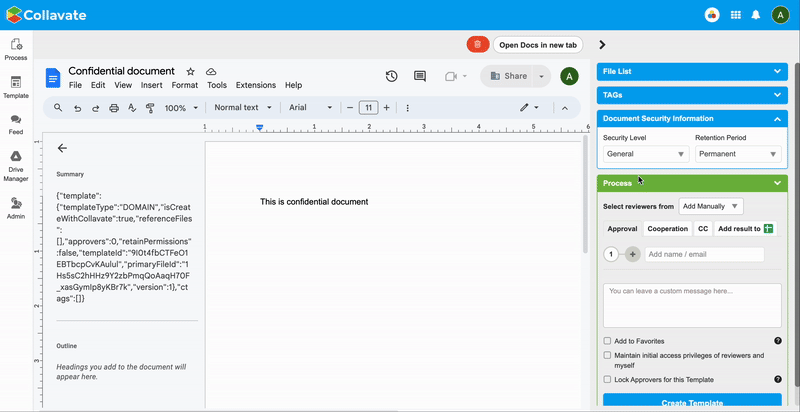
You can assign a document security level to a template and set the corresponding retention period for it.
Enable document security information feature #
To activate the document security information feature, please follow these instructions:
- From the menu list, click
- In the navigation menu, click Process.
- Turn on Document Security Information
.
- In the default security level settings, set the default document level for documents being submitted.
- In the default retention period settings, set the default retention period for documents being submitted.
- Click Save Settings.
Add document security information to template #
To add a document level and retention period to an approval, follow these instructions:
- From the menu list, click
- Choose the template you will use.
- On the right, click the Document Security Information tab, then specify the document level and retention period.
Note: Even after the retention period expires, the document will not be altered or deleted.